Thursday, September 27, 2012

SQL: Restore Database Error

Sometime it happens that if you try to restore the database backup then you get this kind of error:

// ***************************************************************************
TITLE: Microsoft SQL Server Management Studio Express
------------------------------

Restore failed for Server 'MY-PC\SQLEXPRESS'.  (Microsoft.SqlServer.Express.Smo)

For help, click: http://go.microsoft.com/fwlink?ProdName=Microsoft+SQL+Server&ProdVer=9.00.3042.00&EvtSrc=Microsoft.SqlServer.Management.Smo.ExceptionTemplates.FailedOperationExceptionText&EvtID=Restore+Server&LinkId=20476

------------------------------
ADDITIONAL INFORMATION:

System.Data.SqlClient.SqlError: The operating system returned the error '5(Access is denied.)' while attempting 'RestoreContainer::ValidateTargetForCreation' on 'c:\Program Files\Microsoft SQL Server\MSSQL.1\MSSQL\testdb.mdf'. (Microsoft.SqlServer.Express.Smo)

For help, click: http://go.microsoft.com/fwlink?ProdName=Microsoft+SQL+Server&ProdVer=9.00.3042.00&LinkId=20476

------------------------------
BUTTONS:

OK
------------------------------

//********************************************************************************

Don't worry at all I am going to tell you how to resolve this issue using screen shot.

Just see below screen shot and you will get to know how to do it.

Step 1: Restore Database Window:


Step 2: Restore Database Error


Step 3: Restore Database Error Fixing:


In the above screen shot change the paths for the MDF and LDF file with following location:
C:\Program Files\Microsoft SQL Server\MSSQL.1\MSSQL\Data\testdb.mdf
C:\Program Files\Microsoft SQL Server\MSSQL.1\MSSQL\Data\testdb.ldf

Click OK and your database will get restore successfully.


Friday, September 14, 2012

Tool: SQL Prettry Printer

People who are students or related to programming field may some time need to work with SQL or MySQL databases. As you know when you have to work with queries then sometimes it becomes very difficult to understand a query due to bad formatting.

I am sharing a tool which makes your life easier and I also got a lot of benefit from it.

http://www.dpriver.com/dlaction.php

Above is the download link.

Below is the example which I have taken from dpdriver.com website.


SELECT   i.obj#,
         i.samplesize,
         i.dataobj#,
         Nvl(i.spare1,i.intcols),
         i.spare6,
         DECODE(i.pctthres$,NULL,NULL,
                            Mod(Trunc(i.pctthres$ / 256),256)),
         ist.cachedblk,
         ist.cachehit,
         ist.logicalread
FROM     ind$ i,
         ind_stats$ ist,
         (SELECT   enabled,
                   MIN(cols) unicols,
                   MIN(To_number(Bitand(defer,1))) deferrable#,
                   MIN(To_number(Bitand(defer,4))) valid#
          FROM     cdef$
          WHERE    obj# = :1
                   AND enabled > 1
          GROUP BY enabled) c
WHERE    i.obj# = c.enabled (+) 
         AND i.obj# = ist.obj# (+) 
         AND i.bo# = :1
ORDER BY i.obj# 

The original query is written below which I have formatted using SQL Pretty Printer tool.

select i.obj#,i.samplesize,i
.dataobj#,nvl(
i.spare1,i.intcols),i.spare6,dec
ode(i.pctthres$,null,null,mod(trunc(i.pctthres$/25
6),256)),ist.cachedblk,ist.cachehit,ist.logicalrea
d from ind$ i, ind_stats$ ist, (select enabled, mi
n(cols) unicols,min(to_number(bitand(defer,1))) de
ferrable#,min(to_number(bitand(defer,4))) valid# f
rom cdef$ where obj#=:1 and enabled > 1 group by e
nabled) c where i.obj#=c.enabled(+) and i.obj# = i
st.obj#(+) and i.bo#=:1 order by i.obj#

Hope you will like this tool and your databases queries becomes easier to understand. Please share some other tool if you know and I will surely add it on the blog.

Website: Color Combination Website

I want to share a site which I have used myself for getting color combinations based on a background color. Hope its really helpful for others also.

http://www.cs.brown.edu/cgi-bin/colorcomb

If anybody can provide a better website which is providing nice color combinations then let me know.

Monday, September 10, 2012

CSS: Margin

CSS Margin:
Margin is the distance from neighboring elements. Padding and Margin are nearly the same. Padding is for a single element and related to element itself while margin is related to other elements or controls around another control.
Example:
I am creating a div having a border and then put up an paragraph inside it and apply margin on it. This example will make you understand the margin concept very well.

The code that I have used along with setting margin on Left button is given below:
        
Hope you have got the idea of margin well. Your suggestions for improvements will be highly appreciated.

Sunday, September 9, 2012

CSS: Padding

Padding is the space between an element border and the content inside it.
Example1:


Button having padding 15 from top, right, left and bottom.

    // myprogrammingzone code


            Button having padding 15 from top, right, left and bottom.
    // myprogrammingzone code
    
Example 2:


Button having padding-top: 10px; padding-right: 20px; padding-bottom: 30px; padding-left: 40px;

    // myprogrammingzone code
    
        Button having padding-top: 10px; padding-right: 20px; padding-bottom: 30px; padding-left:
        40px;
    // myprogrammingzone code
    

Example 3:


Button having padding-top: 10px; padding-right: 20; padding-bottom: 30px; padding-left: 40px;

    // myprogrammingzone code
    
        Button having padding-top: 10px; padding-right: 20px; padding-bottom: 30px; padding-left: 40px;
    // myprogrammingzone code
    
There are four forms in which padding can be set which are explained below:
padding:10px 20px 30px 40px;
        padding-top: 10px
        padding-right: 20px
        padding-bottom: 30px
        padding-left: 40px;
    
padding:10px 20px 30px;
        padding-top: 10px
        padding-right: 20px
        padding-bottom: 30px
        padding-left: 20px;
    

padding:10px 20px;
        padding-top: 10px
        padding-right: 20px
        padding-bottom: 10px
        padding-left: 20px;
    

padding:10px;
        padding-top: 10px
        padding-right: 10px
        padding-bottom: 10px
        padding-left: 10px;
    

Hope you will get the idea for padding very well.

Saturday, September 8, 2012

Javascript: Set Label Text


In this post I am going to give an example of how to set a label text using Javascript.


Below is the code that I have used to set the label text.


    // myprogrammingzone code


    // myprogrammingzone code


Javascript: Date Object

Date Object
Date object is used to manipulate date and time.
There are four different constructors that can be used to instantiate a Date.

var d = new Date();
var d = new Date(milliseconds);
var d = new Date(dateString);
var d = new Date(year, month, day, hours, minutes, seconds, milliseconds); 

To return todays date and Time you can use the first Line of code.


The code that has been used to create and show date and time will be shown below:
// myprogrammingzone code


// myprogrammingzone code

Hope this will help you understand the basics of Date objects.


Javascript: Popup Making Tool


Make a Popup Window
In this post I am going to provide a tool for creating a Popup Window. This tool will also give you the code that you can use in your sites and you can test the Popup Live and when you are satisfied then copy the code and then paste it in the click event of either button or link or at any other event you want it to use.


Scrollbars
Location
Toolbar
Menu Bar
FullScreen
Dependent
Directories
Resizable

Top:

Left:

Width:

Height:


Test Popup with Current Settings


Hope you will enjoy the post and it will be a useful tool for you.


Friday, September 7, 2012

Javascript: Popup Window

In this post I am going to give an example of Popup Window creation using Javascript function call.


Below is the javascript function that has been used to create this Popup.
// myprogrammingzone code


// myprogrammingzone code


Its a simple example to create a Popup Window using Javascript. Give me suggestions for improvement.

Thursday, September 6, 2012

Javascript: Alert, Prompt and Confirm Message Boxes

You may have seen a lot of web sites which display popup messages or message boxes. That's really simple do that. In this post I am going to tell you how to create a message box and will give an example to test the code I will  provide as well.

Javascript Alert Box Example:
Click the below button and a alert box will be shown on website.


Below I have given the code that I have used to display a message box on the site. I have used javascript which you may be familiar with. I have written a javascript function and then called that function on the click event of the button.

// myprogrammingzone code


// myprogrammingzone code


Javascript Prompt Message Box:
Click the below button and a prompt message box will be shown on website.


Below I have given the code that I have used to display a message box on the site. I have used javascript which you may be familiar with. I have written a javascript function and then called that function on the click event of the button.

// myprogrammingzone code


// myprogrammingzone code


Javascript Confirm Message Box Example:
Click the below button and a alert box will be shown on website.


Below I have given the code that I have used to display a message box on the site. I have used javascript which you may be familiar with. I have written a javascript function and then called that function on the click event of the button.


// myprogrammingzone code


// myprogrammingzone code

Hope you have enjoyed this post. Send me suggestions to improve it.

HTML: Fixed Size and Resizable Text Area

Text Area are mostly used for data entry in web forms. They could be resizable on run-time and can also be created with fixed size having particular width and height.

Resizable Text Area:

Below I am showing a Resizable text area and its respective code which I have used to create it.

Below is the html code that has been used to create Resizable text area.
// text area code

// text area code

Fixed Size Text Area:

Now next I am going to show an example of fixed size Text Area.


Here is the html source used to create Fixed Size Text Area:
// text area code

// text area code

Hope you will found this post useful. Send suggestions for improvement.

Wednesday, September 5, 2012

Regular Expressions

Regular Expressions is an important part of development. Although it seems simple but to write complex regular expressions is very difficult task. Regular Expression are used to validate data against it and also used for pattern matching and for searching and replacing of strings.

I am providing a facility here by which you can validate expressions also.


Regular Expression: Test String:

Result:


Below are the list of characters which are used in Regular Expressions for creating Regular Expressions.

Wildcard Character Description
* Zero or more occurrences of the previous character or sub-expression.

For Example:
PREV*included

Matched:
included
PREVincluded

Not Matched:
PREVPREVincluded
(Although Description says sub-expression could occur multiple time but actually it can occur only single time like in below example.)

Second Example:
a*included

Matched:
included
aincluded
aaincluded
aaaincluded

Not Matched:
abincluded
aacincluded
aaabhdgincluded

+
One or more occurrences of the previous character or sub-expression.

For Example:
PREV+included

Matched:
PREVincluded

Not Matched:
included

PREVPREVincluded
(Although Description says sub-expression could occur multiple times but actually it can occur only single time like in below example.)


Second Example:
a+included

Matched:
aincluded
aaincluded
aaaincluded

Not Matched:
included
aacincluded
aaabhdgincluded


()
Groups a sub-expression that will be treated as a single element.

For Example:
(SingleElement)+

Matched:

SingleElement
SingleElementSingleElement
SingleElementSingleElementSingleElement
SingleElementSingleElementSingleElementSingleElement
and many more like above.
| Its same like OR operator which takes two operands and match any one operand or both.

For Example:
First|Second

Matched:
First
Second

Second Example:
http|www|ftp

Matched:
http
httpwww
httpwwwftp
httpftpwww

{}
Matches one character in a range of valid characters.

For Example:
[A-D]

Matched:
A
ABCD
AF
B12

Not Matched:
NF
KJ
12
12
$#

[^]
Matches a character that isn’t in the given range.

For Example:
[^A-C]

Matched:
D
D1
123abc
abc
and many more like above.

Not Matched:
A
B
C


.
Any character except newline means instead of dot (.) character you can use any character but you cannot find matches in multiple lines.

For Example:
.word

Matched:
aword
bword
Aword
1word
#word
and many more like above.

Not Matched:
word
abword
12word
AB12dvfword
#$word

Could not match in multiple lines.

\s
Any white-space character (such as a Tab or Space).

For Example:
Space Character
Tab Character
New Line Character
Carriage Return
Form Feed Character
Vertical Tab Character


\S
Any non white-space character.

For Example:

Matched:
Any alphanumeric or special character

Not Matched:
Space Character
Tab Character
New Line Character
Carriage Return
Form Feed Character
Vertical Tab Character


\d
Any digit character.

For Example:
\d

Matched:
Match any character from 0-9

Not Matched:
Any alphabetic character or special character.


\D
Any character that isn’t a digit.

For Example:
\D

Matced:
Match any alphabetic or special character.

Not Matched:
Any character from 0-9


\w
Any “word” character (letter, number, or underscore).

For Example:
\w

Matched:
A-Z, a-z, 0-9 or underscore

Not Matched:
Special characters except underscore.


\W
Any non word character.

For Example:
\W

Matched:
%
$
#
any other character which are not in Not Matched category below.

Not Matched:
A-Z, a-z, 0-9


Hope you have found the post useful. I am grateful for your positive feedback to improve.


Sunday, September 2, 2012

Visual Studio Setup and Deployment Project

I am writing this post to create Setup and Deployment Project in Visual Studio 2005. Hope this will be really helpful for those who are creating such project for the first time. The steps followed in this project is nearly same both for Windows Desktop Applications projects and for Web Application Projects.

Step 1 (Setup Project Initial Step):
First of all there should be a Windows Project or Web Project for which Setup Project is needed to be created.
Its not necessary that you should load your project in Visual Studio for which you want to create installer.
In current example I have loaded a previous project which is a Windows Application  for which I will create a setup project. You can see WindowsApplication5 Project loaded in Visual Studio.


Step 2 (Creating a Setup Project):
Right click on the Solution Project and select New Project option from Add option sub menu.


Step 3 (Selecting Project Type):
Below is the Add New Project form.
Select Setup and Deployment from Other Project Types.
From the templates section select Setup Project template.
Enter the name for Setup project if you want.
Select the location if you want to change the default location for saving the project files.
Click OK.


Step 4 (Setup Project Loaded in Solution Explorer):
In below screen you can see that a Setup project gets added in Solution Explorer by the name Setup1.
On the Left Window File System Window is highlighted which is an option for Setting folder options in Setup Project.


Step 5 (Add Project Output):
Next we need the Output for our project for which we are creating setup.
Right click and Select Project Output option from Add option sub menu.


Step 6 ( Add Project Output):
Below you can see the Add Project Output form in which you need to select the Primary Output and from Project option you select the application for which setup is required.
Click OK.


Step 7 (Project Output Added to Setup Project):
In below  screen you can see the Project Output gets added to the Setup Project.


Step 8 (File System Settings for Setup):
Right click on Setup Project and select File System option from View sub menu.
On the left window you will see File System Window will appear. Here you have three folders for which we set few settings that are optional.
First is adding any extra files like help files to be added in Application Folder.
Second is adding Shortcut to Desktop for the Application.
Third is adding Shortcut to Programs menu for Application.


Step 9 ( Adding Shortcut on Desktop or Programs Menu):
Right click on Users Desktop Folder in File System Window or the Users Programs Menu if you want to add shortcut to any of them or both.
Next Right click in the Right Window and select Create New Shortcut option.


Step 10 (Select Item in Project):
Since you have application in Application Folder double click Application Folder.


Step 11 (Select Application Output):
Select Application Output for which we want to create shortcut from the Application Folder.
Click OK.


Step 12 (Shortcut Added):
In below screen that after the above step gets complete the Shortcut gets added to the Right Window.


Step 13 (Building the Setup Project):
Next we need to Rebuild or Build the Project  after Right clicking on Setup Project.


Step 14 (Installing Setup):
For installing the setup Right click on the Setup Project and click Install.
For uninstalling the Setup Right click on the Setup Project and click Uninstall.


Step 15 (Setup Project Installation):
Here our Setup got run and we can follow the installation Steps and out application gets installed on the System.


This is a long post may be I have skipped some thing since I have to give a basic understanding of how to create a setup project. Give me comments if you need any improvement.

Visual Studio 2005 Smart Phone Project

In this post I am going to create a Smart Device Application using Visual Studio 2005.

If you need an Overview of Visual Studio 2005 then you may found this post useful:
Visual Studio 2005 Window Application Project

Step 1 (Open Up Visual Studio 2005):
First of all open up Visual Studio 2005 from Programs menu. Select the Project option from New Sub Menu in File Menu.


Step 2 (Select Project Type):
In New Project Window select the Smart Phone 2003 option from Smart Device Category.
From the templates select the Device Application (1.0) option.
Set the Name of the Project if you want.
Set the Location where to save project files if you want to change default location.
Set the Solution Name if you want.
Click OK.


Step 3 (Smart Phone 2003 Application Project Loaded):
Now you can see in the below screen that the project gets loaded. I have set few things.
I have added a Label on the Form.
I have set its Text property to My Smart Phone.
I have highlighted the Solution Explorer which contains all the files that are contained in project.
At last I have clicked Debug option.

(Note: When you build the application you may get the error that .Net Framework 1.1 is required. You can select the Upgrade Project Option from Project menu.)


Step 4 (Select Deployment Device):
When I pressed Debug then a Dialog gets open which will ask me to select the device on which I want to deploy my project application. Since I don't have Windows CE device therefore I have select the third option of Pocket PC 2003 SE Square Simulator. There are many other options which you can also select.


Step 5 (Smart Phone Application Deployed on Pocket PC Emulator):
Here in below screen you can see that our application gets deployed to Pocket PC 2003 emulator.


Hope you found this post useful if you want to improve it then give me suggestions.

Saturday, September 1, 2012

Pocket PC Project in Visual Studio 2005

In this post I am going to create a Pocket PC2003 Project in Visual Studio 2005.

To get an overview of Visual Studio 2005 you can visit my previous post on below link:
Visual Studio 2005 Window Application Project

Step 1 (Open Visual Studio 2005):
Open Visual Studio 2005 from Programs menu and then click File menu option and select Project option from New Sub menu.


Step 2 (Visual Studio 2005 Pocket PC 2003 Project):
New Project window gets shown. Click on Smart Device Project Type which contains Pocket PC 2003 option, click on it and select Device Application option from the Templates. You can change the default Name of Project, Location and Solution Name and then click OK.


Step 3 (Pocket PC 2003 Project):
Project gets loaded in Visual Studio and you can see the below screen shot which contains the Solution Explorer containing files used in project. I have added a Button from Toolbox to the default form on Pocket PC and names it  Show Message on Click. I have added a click event for this Button and added following code in it.

private void button1_Click(object sender, EventArgs e)
{
     MessageBox.Show("Button Click Message.");
}


I have changed Button Text using Properties Window Text Property which I have highlighted.


Step 4 (Deploy Pocket PC Application on Simulator):
Next click on Debug button in Menu bar which loads the following Window asking for selecting the Device on which to deploy and test the application. Currently I have select the Second option. If you have a Pocket PC then you can connect it with your PC and can select the first option. The other three options below second option could also be selected if you don't have Pocket PC..


Step 5 (Pocket PC Application Deployed):
Here you can see your applications gets deployed to Pocket PC 2003 emulator.


Step 6 (Application Button Click):
Click on the button shown in Application Show Message on Click. When you click it the click event we have written for it will be called and a message box gets displayed inside the emulator.


Hope you have enjoyed this post. I really appreciate your participation to make this post better.

Visual Studio 2005 Window Application Project

I am creating a Visual Studio 2005 project. This post will be for the absolute beginners who are not familiar with the Visual Studio environment and how to create the project.

Microsoft has provided best Integrated Development Environments which are easier to learn and programmers love to work with the tools they have provided.

Microsoft has provided the free versions for Visual Studio and currently Visual Studio 2012 is going to be launched which will be hope so more better then its previous version Visual Studio 2010.

Visual Studio Express editions are free to download and develop desktop and web applications.

Check below links for downloading Visual Studio different versions:

Visual Studio 2005 
Visual Studio is launched in 2005.
Visual Studio 2008 
Visual Studio 2008 is launched in 2008.
Visual Studio 2010 
Visual Studio 2010 is launched in 2010.
Visual Studio 2012 
Visual Studio 2012 is launched in 2012.


Step 1 (Open Visual Studio 2005):
Open Visual Studio 2005 using Programs menu. The initial form that gets loaded after Visual Studio 2005 gets open. Below is the screen shot for Visual Studio 2005 Start Page.


Step 2 (Create New Project):
To create a New Project in Visual Studio 2005 click on File menu and select Project option from New sub menu as shown in screen below. You can also use short cut key Ctrl+Shift+N.


Step 3 (New Project Creation Dialog):
When a New Project option is selected then a New Project form gets loaded which show the different Project Types which can be created in Visual Studio 2005 along with the templates within each Project Type. I have highlighted all the parts contained in New Project form.


Step 4 (New Project in Visual Studio):
Below is the default project screen which gets loaded in Visual Studio 2005. I have added few changes to complete my example. Like I have added a Label from Toolbox which I have highlighted in the below screen. I have also highlighted the Solution Explorer portion which contains all the files contained in the project. Below it is the Properties Panel which is showing properties for the Label on the form having text My First Window Application. In the menu portion I have highlighted the Debug button to debug and Run the project. I have shown a form which gets loaded after I clicked on this Debug button.


Step 5 (Debug and Run Project):
In the above screen shot I have highlighted the Debug menu button. When I clicked on it then project gets build first and then it got Run and our application gets loaded as shown in form below which is the only form contained in our application. Its same concept like Index page in Websites.


Download Visual Studio 2012

From Microsoft.com:
  • Visual Studio 2012 Express:


    Hardware Requirements

    • 1.6 GHz or faster processor
    • 1 GB of RAM (1.5 GB if running on a virtual machine)
    • 4 GB of available hard disk space
    • 100 MB of available hard disk space (language pack)
    • 5400 RPM hard drive
    • DirectX 9-capable video card running at 1024 x 768 or higher display resolution

     Supported Operating Systems

    • Windows 7 SP1 (x86 and x64)
    • Windows 8 (x86 and x64)
    • Windows Server 2008 R2 SP1 (x64)
    • Windows Server 2012 (x64)

    Supported Architectures

    • 32-bit (x86)
    • 64-bit (x64)

    http://go.microsoft.com/?linkid=9810172

    Download Microsoft Visual Studio 2005

    From Microsoft.com:
    From Amazon.com:
    • Microsoft Visual Studio Professional 2005:


    SQL Server 2005 Management Studio Express New Database Creation

    In this post I will tell you how to create a New Database in Microsoft SQL Server 2005 Management Studio Express.

    If you need to download SQL Server 2005 Express edition which is free the use the below link:
    http://www.microsoft.com/en-us/download/details.aspx?id=21844

    If you want to purchase SQL Server 2005 Developer Edition then use below link:


    Step 1(SQL Server 2005 Management Studio Express Overview):
    Open up Microsoft SQL Server 2005 Management Studio Express from Programs menu. Below I have shown the Overview window of Management Studio Express.


    Step 2 (SQL Server Database Creation Option):
    When you click on Databases folder then you will get a context menu having New Database option which will be used for creating New Database.


    Step 3 (SQL Server New Database Creation Window):
    Now we have got New Database Creation Window. Enter the name of the database which you want to create. When you enter the database name then database files gets shown in list box which is highlighted in below screen. Keep the default setting and click OK and your database gets created successfully.


    I will highly appreciate your suggestions to make this post better.

    SQL Server 2005 Management Studio Database Backup

    In this post I will show up the steps which are involved in SQL Server Database Backing up.
    Although its a simple process but you will find it more easier after looking at the screen shots.


    If you need to download SQL Server 2005 Express edition which is free the use the below link:
    http://www.microsoft.com/en-us/download/details.aspx?id=21844

    If you want to purchase SQL Server 2005 Developer Edition then use below link:


    Step 1 (SQL Server 2005 Management Studio Express):
    Open up the SQL Server 2005 Management Studio Express from Programs menu.


    Step 2 (SQL Server Database Backup Option):
    Select  the SQL Server Database Backup option after right clicking the database for which you want to take backup.


    Step 3 (SQL Server Backup Form):
    Below is the database Backup form for the database that was selected for taking backup. Currently the default options have been highlighted which you can change if you want like backup file name or the path where you want to save the backup file. Finally click OK.


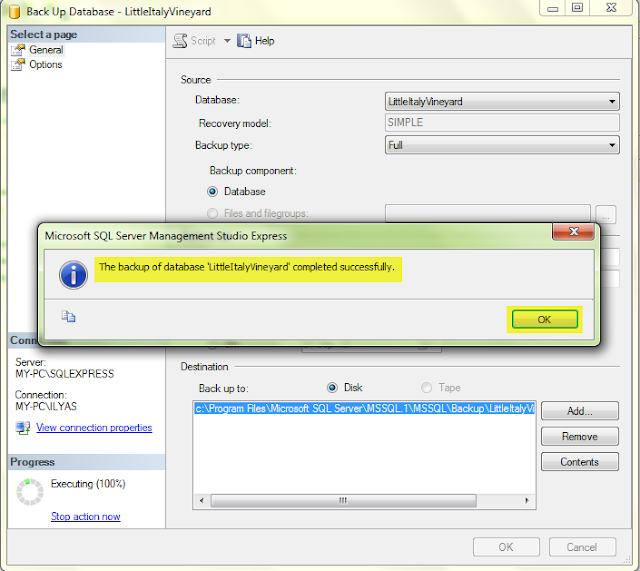
    Step 4 (SQL Server Database Backup Successful):
    Finally you will get message that the backup of database has completed successfully.


    Hope you find it helpful but I am really grateful if you give me suggestions to improve it and I will update the post again.

    Microsoft SQL Server 2005 Management Studio Express Database Backup

    In this post I will let you know how to delete Database from Microsoft SQL Server 2005. Although its very easy and simple if any one has done this before but for new programmers and students this step by step process helps a lot.


    If you need to download SQL Server 2005 Express edition which is free the use the below link:
    http://www.microsoft.com/en-us/download/details.aspx?id=21844

    If you want to purchase SQL Server 2005 Developer Edition then use below link:


    Step 1 (Microsoft SQL Server 2005 Overview):
     First of all you have open up Microsoft SQL Server 2005 Management Studio Express which can opened from Programs menu. Below is the overview window showing the databases contained in SQL. I am going to delete MyDatabase database in this tutorial.


    Step 2 (SQL Server Database Delete Option):
    Right click on MyDatabase database which we want to delete and click on Delete option from context menu that is shown.


    Step 3 (SQL Server Database Deletion Form):
     After the second step a Delete Form gets shown containing Database name which we want to delete. I have highlighted two check box options in below screen. You must check both of them otherwise you may get error that database could not be deleted. Then click OK and deletion process gets start.


    Step 4 (SQL Server Database Deleted Successfully): 
    After completing Step 3 without error you will be shown SQL Overview window again and you can see that database is not showing in Databases list which we have delete.


    Hope you will find it easy but if you want to improve it then give me suggestion and I will update this post.

    Microsoft SQL Server 2005 Restore Database Backup

    I am going to let you know  about the steps which are required to Restore a SQL Database file to SQL Server 2005. First you need to install SQL Server 2005 Management Studio Express which I am currently using in the screen shots.

    If you need to download SQL Server 2005 Express edition which is free the use the below link:
    http://www.microsoft.com/en-us/download/details.aspx?id=21844

    If you want to purchase SQL Server 2005 Developer Edition then use below link:


    Its very easy for the experienced developers and students but very much helpful for the beginners. Just follow the steps along with screen shots and it will take short time to restore a database from database backup file.

    Step 1 (Microsoft SQL Server Management Studio):
    Open the Microsoft SQL Server Management Studio Express from Programs  Menu. In the below screen shot the welcome screen is shown after you login to SQL Server Management Studio. I have highlighted the database currently contained in SQL Server.


    Step 2 (Microsoft SQL Server Restore Database Option):
    Right click on Databases Folder as shown in blue in below screen. Here you will see Restore Database option which you need to click to move to next step.


    Step 3 (Microsoft SQL Server Restore Database Form):
    In the below screen shot you can see the highlighted portions. To database field will contain the name of database you want to give to the restored database.
    From Device option is to browse the SQLBackup file which needs to be restored.


    Step 4 (Specify SQL Backup File):
    In this step you need to click the highlighted button in Restored Database form and a Specify Backup window gets open.
    When you click on Add highlighted button, a file browser window gets open thorugh which you select the SQL Backup file which you want to restore. After selection of SQL Backup file the path gets shown in Backup Location option. After SQL Backup file selection click OK.


    Step 5 (Specify Name for Restored SQL Database):
    Now your select the desired database set to Restore and check it. There could be multiple sets to Restore and you have to check which one to restore. Next add the Database Name in To database field. Finally click OK.


    Step 6 (SQL Backup Restored):
    In the below screen you would be able to see MyDatabase gets restored successfully.


    Hope you will find it helpful. Let me know if you have any confusion and I will update it.